An overview of Vertex.ai
Invalid date
Vertex.ai is a Google Cloud service that enables the user to build, deploy, and scale data pipelines and machine learning models. It includes some services to track and manage model artifacts, performances and metrics. Google provide a Python SDK that permits the user to interact directly with the different services.
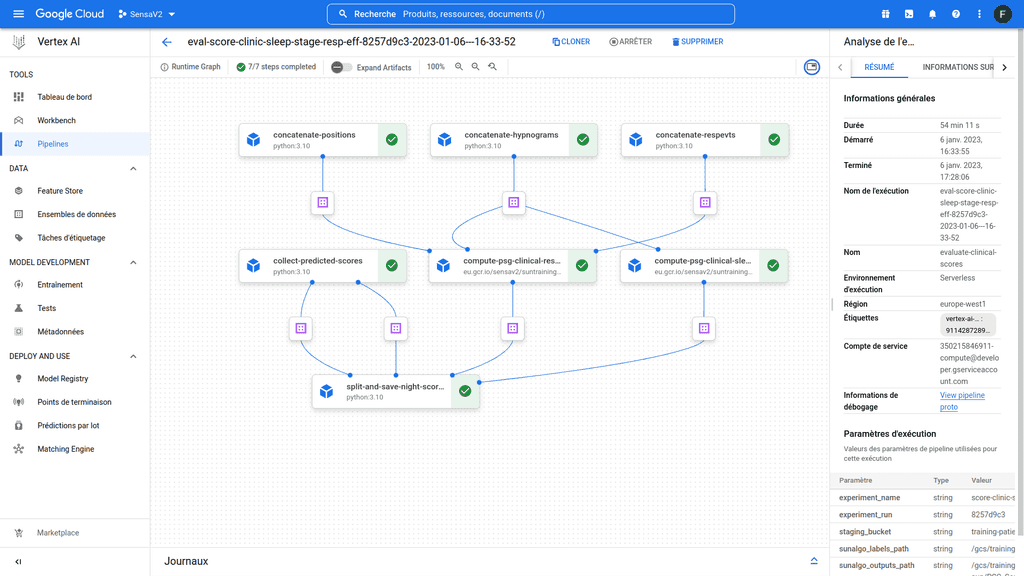
Vertex AI pipeline allows you to orchestrate different steps of a data pipeline. Each step of the pipeline is an autonomous piece of code that will be executed in its own container. Each of these steps can accept inputs and generate outputs for downstream steps. Altogether the steps define a workflow that can be represented as an directed acyclic graph (DAG) (Figure 1). Here I am going to gather some personal notes and feedbacks related to my own experience with this cloud service and try to provide some personal advises.
Figure 1 : Example of a vertex ai pipeline
Anatomy of a component
The core unit of computation is called a component. A component is an independent piece of code that will be uploaded and containarized in the Vertex platform to be executed. With Vertex, you can use the Kubeflow pipelines sdk to implement your code. A typical components can be implemented as followed.
from kfp.v2.dsl import (
    Dataset,
    Input,
)

@component(
    packages_to_install=["put", "here", "librairies", "to", "install"],
    base_image="the docker image to use",
    output_component_file="component_one.yaml",
)
def component_one(processed_data: Output[Dataset]):
    # ---- imports
    # Import your modules

    # ---- Helpers
    # Implemenent helpers functions

    # ---- variable
    # add any local variable

    # ---- Component execution
    # Implement the logic of your component
As you can see, a component is simply a function encapsulated in a @component decorator. The decorator is using three arguments here:
packages_to_install: alistcontaining the name of the libraries you wish to install and that will be used in you component.base_image: a docker image with the basic environment you wish to execute your code on.output_component_file: path where you want the library to generate ayamltemplate of your component that will be interpreted by vertex to execute your task. An example is showed in the supplemental data of this article.
The art of writing component
Being an independent piece of code comes with an important trade-off. Every extra code you need, has to be implemented in the component function. Your import statements must be declared here and any helper functions should be implemented as inner functions if you wish to use them. Any code outside the component will be simply ignored.
At the beginning my components were just huge chunks of code and this was bad. Indeed, inner functions cannot be unit tested which make the maintenance of such code very difficult. To avoid that and after having implemented working components, I refactored the code such that all helpers functions were packaged in our internal library deployed in our private repository. As such these functions can be all unit tested and we can use them by pointing the base_image to a docker image that contains our library. Doing this dramatically reduced the size of our components and make them easy to read and maintain.
Organising your code may helped to. Here the repository structure:
.
├── ai_vertex
│   ├── components
│   ├── __init__.py
│   ├── pipelines.py
│   ├── image1.Dockerfile
│   ├── image2.Dockerfile
│   ├── templates
│   └── cli.py
Components are stored in a components folder and are grouped by task (etl, ml or viz). The pipelines.py is where the DAGs are defined. The templates folder is where the templates will be generated and loaded from by the library to deploy and execute your components. I like to encaspulate my code logic into command line applications (CLI). I use Typer, a library that capitalises on click but brings the programming philosophy and simplicity of FastAPI. I like to use CLI, because it makes the developer experience easier and allow me to encapsulate complex tasks into simple-to-use command lines. In my case, the cli contains all the commands needed to deploy our different pipelines for model training, model evaluation and metrics report.
Making components communicate
Let's update our previous code.
from kfp.v2.dsl import (
    Dataset,
    Input,
)

@component(
    packages_to_install=["put", "here", "librairies", "to", "install"],
    base_image="the docker image to use",
    output_component_file="component_one.yaml",
)
def component_one(raw_data: str, processed_data: Output[Dataset]):
    # ---- imports
    # Import your modules

    # No helpers because we refactored :-)

    # ---- Component execution
    # Implement the logic of your component

@component(
    packages_to_install=["put", "here", "librairies", "to", "install"],
    base_image="the docker image to use",
    output_component_file="component_two.yaml",
)
def component_two(processed_data: Input[Dataset], metrics: Output[Dataset]):
    # ---- imports
    # Import your modules

    # No helpers because we refactored :-)

    # ---- Component execution
    # Implement the logic of your component
Let's understand how a component can generate outputs / artifacts and how these can be digested in downstream steps. Let's imagine the component_one to be a classical processing function that takes raw data, processes it and returns an output ready to be processed by the next step. The raw_data argument is a string that is a path pointing to the source data, a csv file seated in our bucket for example. For I/O operations, you have two choices in Vertex:
- You can use the classical python library to interact with this file on Cloud storage
- You can leverage the power of Cloud storage FUSE. Briefly, FUSE is an abstraction layer on top of Cloud storage that makes python beleive, it is a simple filesystem. As such you can use classic python code to make I/O operations. Let's say you need to save a dataframe as a
csvfile:
# WITH THE LIBRARY
def component_one(raw_data: str, processed_data: Output[Dataset]):
    import pandas as pd
    from google.cloud.storage import Client, Bucket

    gcs_client = Client()
    bucket: Bucket = gcs_client.bucket(bucket_name)
    blob = bucket.get_blob(raw_data)
    # Read data
    my_dataframe = pd.read_csv(
        io.StringIO(blob.download_as_bytes().decode(encoding)),
    )
    # save the dataframe as csv
    bucket.blob(processed_data.path).upload_from_string(
        my_dataframe.to_csv(), content_type="text/csv"
    )

# WITH FUSE
def component_one(raw_data: str, processed_data: Output[Dataset]):
    my_dataframe = pd.read_csv("path_to_data")
    my_dataframe.to_csv("path_destination")
From a developer perspective using FUSE is really neat.
Notice the type of processed_data. It is an Output of type Dataset. Dataset inherits from the Artifact class in the python sdk. It means that outputs are treated as artifacts (files, models, markdown, images). You can read here and here for more details. An artifact holds the representation of an Input or Output object. It contains some interesting properties that allow the developer to manipulate it and extract its path (simple, use the path property as shown in the code example).
Let's implement the second component.
def component_two(processed_data: Input[Dataset], metrics: Output[Dataset]):
    import pandas as pd

    data = pd.read_csv(processed_data.path)
    # run your model !! Fake code !!
    model.fit()
    y_pred = model.predict(X_test)
    metrics_df = compute_metrics(y_train, y_pred_from_train)
    metrics_df.to_csv(metrics.path)
Now that we have our components we need to stick them together in a pipeline.
A pipeline to rule them all
Here the anatomy of our pipeline:
from kfp.v2.dsl import pipeline

@pipeline(
    pipeline_root=PIPELINE_ROOT,
    name="eval-prod-sleep-stage-pipeline",
)
def super_pipeline(
    raw_data_path: str
):
    process_data_task = component_one(raw_data=raw_data_path)
    train_model_task = component_two(
        processed_data=component_one.outputs["processed_data"]
    )
The
pipeline_rootis the location where the pipeline will save runs and their respective artifacts in your cloud environment (buckets).
The magic resides in the possibily of querying outputs of the previous task simply using the property outputs and the function argument name of type Output[Dataset]. This approach is valid for any outputs that needs to be ingested by another step.
Note that here, if one of your task is resource intensive, you can actually specify your needs. Let's imagine that our training needs a lot of memory and cpus.
from kfp.v2.dsl import pipeline

@pipeline(
    pipeline_root=PIPELINE_ROOT,
    name="eval-prod-sleep-stage-pipeline",
)
def super_pipeline(
    raw_data_path: str
):
    process_data_task = component_one(raw_data=raw_data_path)
    train_model_task = component_two(
        processed_data=component_one.outputs["processed_data"]
    ).set_cpu_limit("32").set_memory_limit("128G")
Using the functions set_cpu_limit() and set_memory_limit() allows to do that very easily. Be careful to know the compatible configurations in your Google cloud environment.
Execute the pipeline
To execute the pipeline we use the aiplatform python package. It is pretty simple to implement:
from google.cloud import aiplatform
from kfp.v2 import compiler

def init_pipeline(
    pipeline_function: Callable,
    params: dict[str, Any],
    template_path,
):
    compiler.Compiler().compile(
        pipeline_func=pipeline_function,
        pipeline_parameters=params,
        package_path=template_path,
    )
    aiplatform.init(
        project=project,
        staging_bucket=params["staging_bucket"],
        experiment=params["experiment_name"],
        location=location,
    )
    return aiplatform.PipelineJob(
        display_name=params["experiment_name"],
        template_path=template_path,
        job_id=f'{prefix}-{params["experiment_name"]}-{params["experiment_run"]}-{TIMESTAMP}',
        enable_caching=False,
    )

run = init_pipeline(
    pipeline_function=super_pipeline,
    params=params,
    template_path="templates/super-pipeline-template.path",
    project=gcp_project,
    location=gcp_location,
)

run.submit()
In my code, I created an init_pipeline() function that allows me to instantiate and deploy several pipelines throughout my cli. The steps are quite clear here. First, you compile the code to generate your templates. Next, you use the init function to set the project from the cloud environment and its respective credentials that are stored as instance attributes. Finally, you instatiate a PipelineJob that holds the necessary metadata and templates to execute your task. Once done you can submit your task to vertex.ai
One more thing
Before closing this article I'd like to mention the MLOps capacibilities that vertex offers to users. These are minimal but extremely useful. Indeed, if you need to track models metrics and parameters at each run, the aiplatform library provides some interesting functions. Let's modify our component_two accordingly:
def component_two(processed_data: Input[Dataset], metrics: Output[Dataset]):
  import pandas as pd

  def compute_metrics(label, pred):
    acc = round(100 * metrics.accuracy_score(label, pred), 3)
    bacc = round(100 * metrics.balanced_accuracy_score(label, pred), 3)
    kapa = round(100 * metrics.cohen_kappa_score(label, pred), 3)
    return acc, bacc, kapa

  data = pd.read_csv(processed_data.path)

  aiplatform.init(
    project="sensav2",
    staging_bucket=staging_bucket,
    experiment=experiment_name,
    location="europe-west1",
  )

  with aiplatform.start_run(run=f"prefix-you-can-choose-{experiment_run}") as run:
    model.fit(**model_params)

    y_pred = model.predict(X_test)
    acc, bacc, kapa = compute_metrics(y_train, y_pred_from_train)

    metrics = {
      "accuracy": acc,
      "balanced_accuracy": bacc,
      "kappa": kapa
    }

    # run metrics and model parameters
    run.log_metrics(metrics_to_log_for_run)
    run.log_params(model_params)
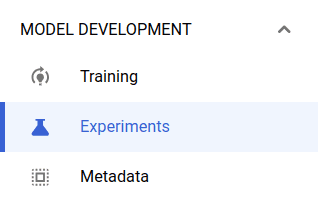
First you need to use the aiplatform.init function and provide an experiment name. An experiment is a logical unit in Vertex that can contain several runs. On the Vertex.ai page you can find them on the left under the MODEL DEVELOPMENT tab (Figure 2).
Figure 2 : The MODEL DEVELOPMENT tab
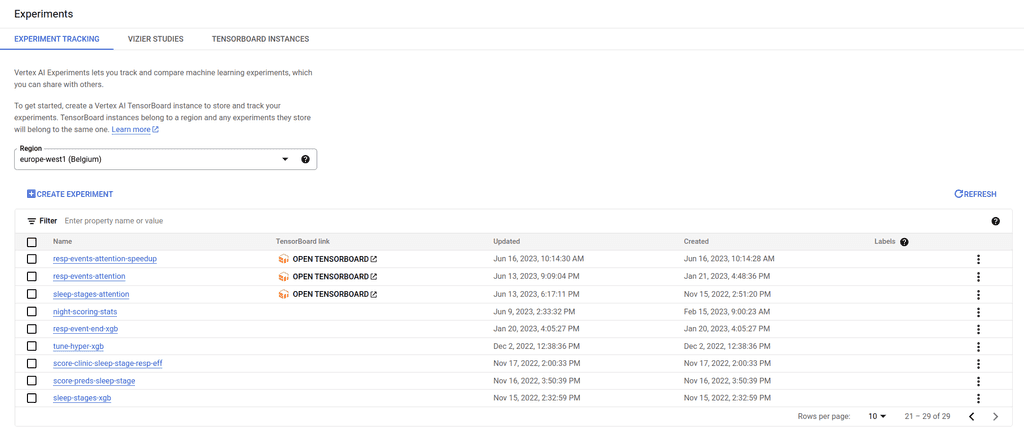
Next, you just need to use the context manager aiplatform.start_run() to which you need to pass an identifier (run). Inside the context manager scope implement your logic for model training and metrics computations. If you need to log the model parameters use the log_params() function. The parameters need to be of type dict. Similarly you can use log_metrics() to log your model metrics. Here again provide the metrics as a dictionnary. Once your model is trained you can find the metrics on your vertex environment. First click on Experiments to list your own experiments (Figure 3).
Figure 3 : The Experiments tab
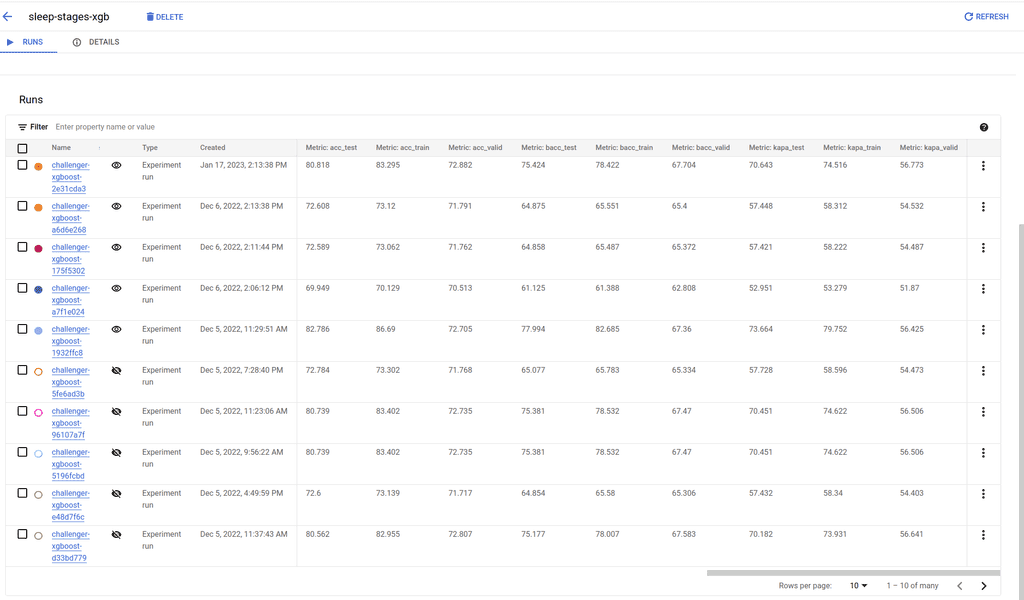
Finally, click on one of them to list your runs with all your logged metrics and parameters (Figure 4).
Figure 4 : An example run with logged metrics
Conclusion
It has been a long time since I wanted to summarize the main aspects of Vertex.ai. I use vertex to train, track models and generate formatted reports that include metrics and other in-house scores. It is very pleasant to use. As a solution for MLOps it does the job but remains limited when compared to other solution like MLFlow or Weights & Biases. Coding using the Kubeflow python sdk can be overwhelming at first especially if you do not take the time to refactor your components. Make them short, it will help for sure.
Supplemental data
# PIPELINE DEFINITION
# Name: name_of_pipeline
# Inputs:
#    my_input: str
# Outputs:
#    my_output: system.Dataset
components:
  comp-name_of_pipeline:
    executorLabel: name_of_pipeline
    inputDefinitions:
      parameters:
        my_input:
          parameterType: STRING
    outputDefinitions:
      artifacts:
        my_outputs:
          artifactType:
            schemaTitle: system.Dataset
            schemaVersion: 0.0.1
deploymentSpec:
  executors:
    exec-name_of_pipeline:
      container:
        args:
        - --executor_input
        - '{{$}}'
        - --function_to_execute
        - name_of_pipeline
        command:
        - sh
        - -c
        - "\nif ! [ -x \"$(command -v pip)\" ]; then\n    python3 -m ensurepip ||\
          \ python3 -m ensurepip --user || apt-get install python3-pip\nfi\n\nPIP_DISABLE_PIP_VERSION_CHECK=1\
          \ python3 -m pip install --quiet     --no-warn-script-location 'pandas'\
          \ 'kfp==2.0.1' && \"$0\" \"$@\"\n"
        - sh
        - -ec
        - 'program_path=$(mktemp -d)

          printf "%s" "$0" > "$program_path/ephemeral_component.py"

          python3 -m kfp.components.executor_main --component_module_path "$program_path/ephemeral_component.py" "$@"
          '
        - "components code is here"
        image: eu.gcr.io/sensav2/suntraining/sunpy
pipelineInfo:
  name: name_of_pipeline
root:
  dag:
    outputs:
      artifacts:
        my_outputs:
          artifactSelectors:
          - outputArtifactKey: name_of_pipeline
            producerSubtask: name_of_pipeline
    tasks:
      name_of_pipeline:
        cachingOptions:
          enableCache: true
        componentRef:
          name: comp-name_of_pipeline
        inputs:
          parameters:
            my_input:
              componentInputParameter: my_input
        taskInfo:
          name: name_of_pipeline
  inputDefinitions:
    parameters:
      my_input:
        parameterType: STRING
  outputDefinitions:
    artifacts:
      my_outputs:
        artifactType:
          schemaTitle: system.Dataset
          schemaVersion: 0.0.1
schemaVersion: 2.1.0
sdkVersion: kfp-2.0.1


